Offensive Tool Development - The Shellcode Compiler Was Right There All Along... (Part 1)
by
TLDR; Linker scripts can be used to generate shellcode via C in a fairly platform agnostic way. This allows offensive developers to use the full capabilities of the Linux Toolchain, sans library code (until a dynamic loader for library calls can be devised)
Also, this post is optional. It motivates the next post in this series which goes into detail about the technique itself, instead of the motivation and avenues of research that lead to it.
Finally, this is not a novel technique. I am attempting to present this technique in a much more friendly way than I was introduced to it. I also do not know who thought of this first, but the FOLIAGE project on github was the earliest example of it I could find.
What we will be studying with this series
- Shellcode Generation with
gcc,ld, andas.
Preliminaries
This article will assume the following of the reader:
- A passing familiarity with C programming and Assembly Language
- An understanding of Linux CLI environment
- Some knowledge of Operating System boot processes
- Some knowledge of exploitation principles
- Having heard of the steps in a basic buffer overflow, for example
This article will also go into a lot of “lemmas” or diatribes about small technical details surrounding this process. That is to say, you do not need to understand everything on your first reading. For the main points I will attempt to be clear and annotate them as important, but I can not promise this notation will be consistent.
Lets begin!
Shellcode Compilers
What is the goal here? What do we mean as shellcode?
For our purposes: shellcode is a chunk of position independent code that is executed in a “remote execution context”. Here a remote execution context could be “in the stack of a poorly written HTTP server”, or in a remote process via a remote access tool, or even something that runs once the userspace-kernelspace boundary is crossed via an LPE. This section needs no motivation. The ability to create these chunks of code is obviously very useful in a offensive development context.
That being said, the process of creating these chunks of code is extremely non-trivial. There are a number of techniques to generate these, and they will be discussed below. If you don’t care, please skip to the section called: Bootloaders (It’ll make sense once you get there)
Classic Shellcode Technique: The Good Ol’ Assembler
A classic technique for the creation of shellcode is, in effect, The most direct possible way. Just writing it in direct assembly and assembling it with the options to output the raw instructions. The details are easier to deliver via example, so we will go through the basic “hello world” example in shellcode. This requires using interfaces that the compiler does not typically expose to programmers. So, for our example, we will emulate the following C code in assembly.
static char* msg = "Hello, Friend\n";

int main(){
  int size = write(1, msg, 14);
  return 0;
}
Upon disassembly this c program uses the write wrapper provided by the OS standard library. These eventually resolve to the actual write syscall, but not without significant layers of abstraction and error checking. (In most standard library implementations these syscall like interfaces provide a clean interface for extracting error conditions via the errno pattern. This constitutes a large amount of the code the standard library provides - in addition to the call to the actual syscall interface itself.).

So, lets look at what this imported write looks like.

Soo, all this extra code just to do this small pattern…
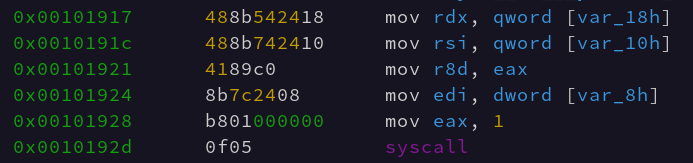
To call kernel functions from userspace, Linux provides a Application Binary Interface called the Linux ABI. To use this ABI the program loads a specific set of registers with the callee function arguments and then loads the A register with a specific syscall number. Then it invokes the userspace interrupt. In 32-bit x86 this was int 0x80, and in x86_64 this interrupt is called via the syscall instruction.
We can see in the above screenshot the Linux ABI registers being loaded via various stack arguments and registers. Once syscall is executed the AX value is overwritten by the return value of the syscall. The x86_64 ABI argument registers are as follows:
reg_seq = ['rdi', 'rsi', 'rdx', 'r10', 'r8', 'r9']
These registers are loaded with argument 1 in rdi, argument 2 in rsi, and etc etc. They often are loaded backwards in assembly language. This convention is preserved from 32-bit x86 assembly where arguments were pushed to the stack “from right to left” which is to say where the last argument is pushed on the stack first. This is why, often, in 64-bit x86 assembly (which does it’s first arguments via registers) the registers are set up in “reverse” order, even though the registers can be set up in a totally arbitrary order.
What follows is our x86_64 write shellcode:
section .text
bits 64
global _start
SYS_write equ 1

_start:
  mov rax, SYS_write
  mov rdi, 1
  lea rsi, [rel msg]
  mov rdx, msglen
  syscall
  ret

msg db "hello, friend",0xa,0
msglen equ $-msg
This, when compiled via the following command; nasm shellcode.s creates a small shellcode binary that is just the compiled instructions we specified.


The only reason this code we wrote is position independent is because we forced it to be via the rel directive in the lea instruction. This causes the assembler to output IP relative instructions. Otherwise the assembler will spit out code that tries to load the address 0x19 instead of [rip + 0x19]. This can cause… issues.
Knowing and remembering all the things that could possibly be relative in shellcode is a significant difficulty in it’s creation. That being said, we are not at the complaining step yet. So, lets continue with this example.
Also, knowing that this is an extremely trivial example, further shows how non-portable and time consuming this variant of shellcode generation can be. Creating a corpus of configurable shellcode binaries such as in the Metasploit Framework was an enormous effort that it’s developers should be commended for.
We’ll save off this shellcode file to test in a moment once we have generated some other examples.
Slightly Less Classic Shellcode Technique: pwntools shellcode generators
pwntools provides a set of chainable generators that output limited set of pre-written chunks of assembly language that can then be compiled and extracted from a specific section. This method is also really useful if you are generating shellcode for platforms that you are not intimately familiar with.
Let’s put together the same write example.
from pwn import *
context.arch = 'amd64'

msg = "hello, friend\n"
sc = shellcraft.amd64.write(1, msg, len(msg))

with open("shellcode.pwn", "wb") as f:
  f.write(asm(sc))

print("OK")
As you can see, the operative portion of this shellcode generator is the call to shellcraft.amd64.write. The process that pwntools uses to generate this shellcode from the write syscall is similar to our previous example with portions of the .s/.asm file being constructed by pwntools when shellcraft is invoked. The call to the asm() function actually invokes the assembler on this generated assembly. Internally pwntools uses some elements of the gnu binutils programs to extract the built shellcode from the binary created by the gnu assembler (gas). The asm files define a special section called .shellcode which contains the assembled template code. This section is then copied out of the created binary via the objcopy program and then returned to the user as binary data.
Even more obscure shellcode technique: radare2 egg compiler
The wonderful and glorious radare2 project includes a subproject called ragg2 or radare2 egg language. It behaves similarly to C with some core functionality stripped out. This means that the ragg2 “compiler” is also able to handle simple examples such as our C shellcode from before. So, let’s compile our shellcode.c with it and see what it puts out.
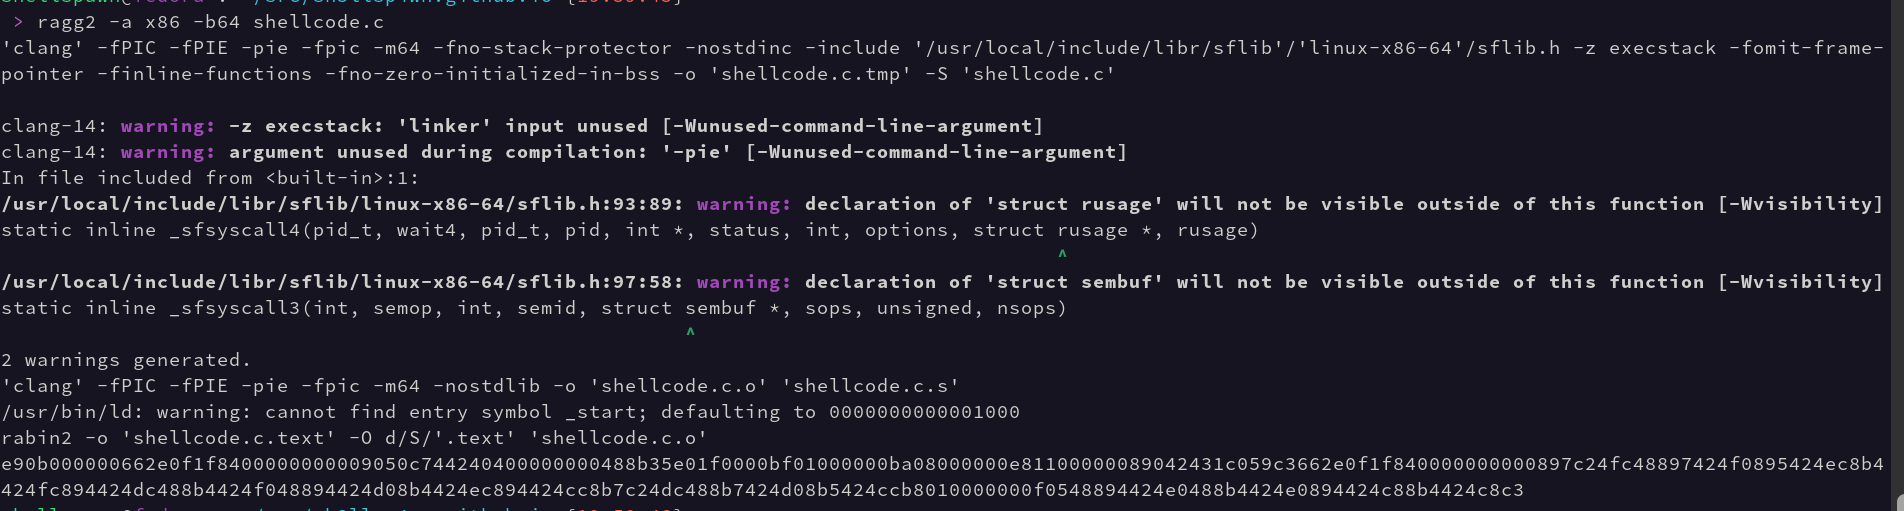
So, based on the output we can see the ragg2 binary calls clang with some special arguments to better prepare the generated code to be used in a shellcode context. This first call uses the -S parameter which tells gcc, clang, and some other compilers to output assembler compatible assembly language rather than a binary file. ragg2 then does… something with this .s file and compiles it from assembly language to an ELF. Once this process is complete ragg2 then uses rabin2 to carve out the .text section, which is our shellcode. We save this off as shellcode.ragg2 and are finally ready to create our shellcode tester.
A Debuggable Shellcode Tester
#include <stdio.h>
#include <stdlib.h>
#include <fcntl.h>
#include <unistd.h>
#include <sys/stat.h>
#include <sys/mman.h>

int main(int ac, char* av[]){
  // expect an arguemnt
  if(ac<2) return 1;

  // local variables for
  // reading shellcode file
  struct stat file_info;
  int ret = 0;
  FILE* fd = NULL;

  // function pointer and
  // the actual shellcode
  unsigned char *sc = NULL;
  void (*sc_exec)(void) = NULL;

  // if stat fails die
  ret = stat(av[1], &file_info);
  if(ret) return 1;

  // create a RWX page with
  // the OS supplied size of
  // the shellcode file
  int mfd = open("/dev/zero", O_RDONLY);
  sc = mmap(NULL, file_info.st_size + 1, PROT_READ | PROT_WRITE | PROT_EXEC, MAP_PRIVATE, mfd, 0);
  if(!sc) return 1;
  close(mfd);

  // open the shellcode file
  fd = fopen(av[1], "r");
  if(!fd) return 1;

  // prepend a breakpoint to the shellcode
  // this can be commented out and the second
  // line with ret ... uncommented to not use
  // the breakpoint
  // if you wanted to be fancy you could
  // ptrace yourself and check if a debugger
  // is attached then only prepend the 0xcc
  // in that case, but this is going in a
  // blog post so it ain't that serious
  sc[0] = 0xcc;
  ret = fread(sc + 1, file_info.st_size, 1, fd);
  //ret = fread(sc, file_info.st_size, 1, fd);
  if(!ret) {
    fclose(fd);
    free(sc);
    return 1;
  }

  // setup the fn pointer
  // and execute it
  sc_exec = sc;
  (*sc_exec)();

  return 0;
}
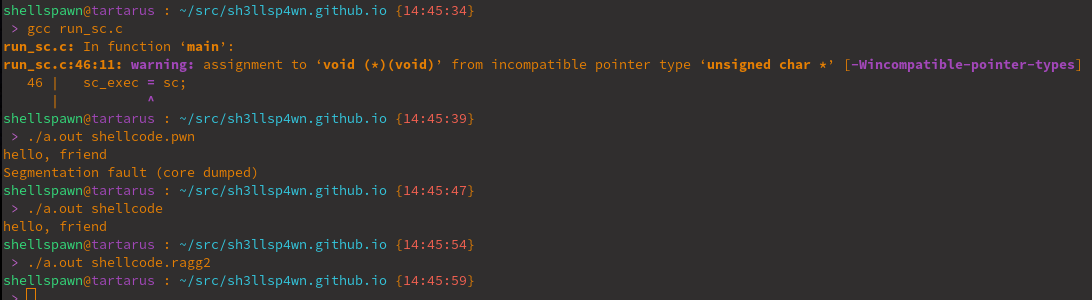
Hmmm… that’s no good.
The only one that worked cleanly was our hand written assembly… One of the issues with current shellcode generation methodologies is that there is no well defined calling definition. This type of standard is like the cdecl and fastcall calling conventions. This means we need to be aware of and compensate for this discrepency. This is a common pain point in shellcode development.
As this is not defined for us: this is a nice point of flexability for our technique. We can conform to the calling convention of whatever application we are attacking.
Bootloaders
Now that we’ve discussed current shellcode generation strategies, lets take a brief aside on bootloaders. Why? We’ll get to that.
There are two main strategies to booting a computer. BIOS and UEFI. UEFI is the current standard for most Intel and AMD x86_64 systems. It relies on a specifically formatted hard drive partition and executes a TE (a flavor of PE) formated executable, which eventually loads the operating system.
The other mechanism for booting modern computers is via the BIOS. The BIOS is an older standard, and is still in use by older desktops, laptops, and servers. Its boot process is simpler than UEFI.
BIOS starts by locating the first block of each of the hard drives attached to the system. If the disk is marked as bootable, then it’s first block will be a Master Boot Record. The MBR has the magic value of 0xAA55, and the code needed to start the system. If this magic value is found, the BIOS will attempt to execute the first block as 16 bit “real mode” assembly.
The standard block size of a hard drive is 512 bytes. Two of those bytes are reserved for the magic, so that technically gives us 510 bytes of assembly to boot the system. There is no format or file type associated with the MBR, it’s just straight up 16 bit x86 opcodes.
The master Boot record is responsible for relocating itself, loading the second stage of the bootloader (grub or BCD, for example), and transitioning into “protected mode” (32 bit x86). If the hardware is 64 bit, then this original switch to protected mode still occurs, and the operating system or bootloader can then transition into “long mode” to finally execute 64 bit instructions.
This may sound more complicated than UEFI, but that is not the case, we are just going into more detail about BIOS style booting.
At this point you are likely thinking, this is an interesting excerpt from a A+ certification course, but what does this have to do with writing shellcode?
Everything of course! This whole process I am describing is still software, and has to be written by people. It’s not hand assembled or pulled out of a different executable file format either, it is actually a completely valid configuration for the Linux toolchain.
We can take advantage of this flexibility to write shellcode, and do so without doing anything that violates or misuses features of the Linux toolchain.
Now let’s create some shellcode.
Oh, wait! I almost forgot to include a furry image to piss off /r/netsec, so here you go. This is Apollo, he’ll be comming along with us for this journey.